How to watermark your photography proofs for the web
Your watermarked photography appearing on a client's Facebook profile is some of the best cheap, effective advertising you can get.
It's visual word of mouth. It's "Hey, check this out!"
And in the land of part time photography where saving time means saving money, efficiency is a virtue.
PartTimePhoto.com readers Liana Cosgrove and Tiffany Lombardi asked me recently how I watermark my online proofs, the same watermark you see on my photos posted with articles here on the site.
So, Liana and Tiffany, here you go!
My watermark workflow includes two things: a PSD (Photoshop) file with my watermark graphic and a Photoshop Action. Technically, two of each - one pair for vertical proofs, one for horizontal.
I'm also working here with Photoshop CS4. If you have a different version or other software, adjust accordingly.
(Check out the Comments below to see reader recommendations for other software and watermarking options.)
First, let's get your watermark made.
THE WATERMARK
My watermark, which has evolved over the last 11 years, is a simple horizontal, semi-transparent bar across the bottom of each proof. It features my logo on one end and web address on the other.
I make my proofs 900x600 pixels in size, so for my landscape-oriented images, my watermark file is 900px wide and 30px tall. For portrait-oriented images, it's 600x30px.
Here's how to make your own watermark (this is for a horizontal proof - for vertical, repeat the process and adjust the width accordingly):
Step 1: Create a new file, the width to match the width of your horizontal proofs, height of 30px.
Step 2: Invert your Background layer to make it black. For good contrast and easy reading, we'll use white text on a black bar for this watermark. Feel free to play with these if you want pink, red, green, or some other colors to match your brand.
Step 3: Select your Text tool and type out your business name on the left side of the bar. Make sure your foreground color / text color is white. If you have a logo already, copy and paste it into this file and resize it to slip into the bottom-left corner. If not, just use a nice font. I like Microsoft Himalaya myself.
Step 4: Text tool again, and type out your web address on the right side of the bar. Try bolding your business name and not bolding your web address, as well as dropping the font size a few notches for the latter.
Step 5: Go to your background layer, Select All, Copy, Paste. Then right-click on your background layer and delete it (here comes the transparency fun!)
Step 6: Go to your Layer menu at the top and Merge Visible.
Step 7: You're almost done! Adjust the Opacity slider in your layers tab to about 50 percent. Create a New Layer. Select this layer, then go to your Layer menu at the top, and Merge Visible again. Congrats, you have a watermark file!
Step 8: Save this file as a Photoshop document so it retains its transparency. Put it somewhere safe, where it won't be moved - this is important for when our Action opens it to place on your proofs.
Go back to step one and repeat this process, except make the watermark file the same width as your vertical proofs, and save this as a separate file.
On to the Action!
THE PHOTOSHOP ACTION
The Photoshop Action I use to watermark my proofs resizes a hi-res file to web size, applies some unsharp mask, opens and copies my watermark onto the proof, moves the watermark to the bottom of the proof, then saves the proof in a specific folder to temporarily hold my proofs.
Using a Photoshop Action lets me not only apply these watermarks very quickly, but also to batch apply them in Bridge.
Here's how to make an Action to watermark your proofs:
Step 1: Open up a horizontal, full-size image you would like to turn into a proof.
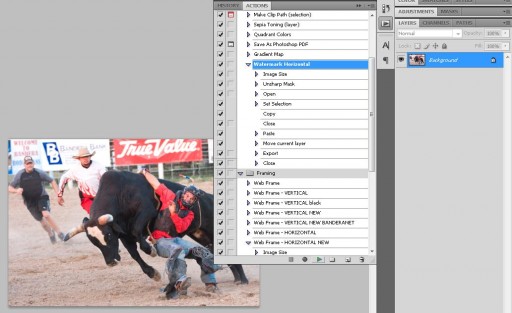
Step 2: Open the Actions tab on your right-side menu (if you don't see it, look under your Window menu at the top) and click on Create New Action at the bottom of that tab (tiny folded paper icon). Name your action Watermark Horizontal and click Record.
Step 3: Photoshop is now recording your every move. Let's start by resizing the image down to web size. Since we're working on a horizontal file, let's resize the Width to 900px (or your preference). You'll notice Image Size has been added to your Watermark Horizontal action.
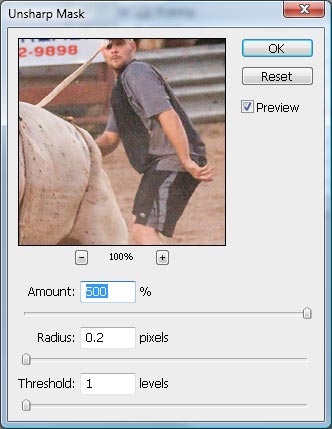
Step. 4: Apply Unsharp Mask (under Filters - Sharpen). I like settings of 500, 0.2, 1.
Step 5: Open the watermark file we made earlier. Select All, Copy, Close, and Paste to your proof.
Step 6: Move the watermark bar down to the bottom of your image.
Step 7: Save For Web at 70 quality (or your preference) as a JPEG and click Save. We'll need to create a folder to receive the proofs from our new actions, so navigate to where you want that folder to go, create a New Folder, and name it Proof Catch. Click Save again.
Step 8: Close your file. Photoshop will ask if you want to save the image - Just Say No.
Step 9: You've created your own watermark action! Click the square Stop button next to the red Record button.
Again, go back and follow these steps to create an Action for your vertical images. Just select your vertical watermark file in Step 5.
Great work! Let's test this new action out.
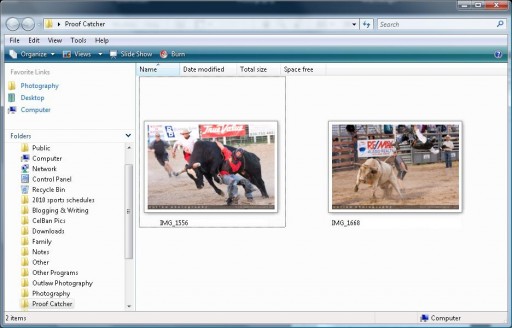
Open a full-size horizontal image of your choice. Click your Watermark Horizontal action and hit the Play button at the bottom of the tab. Watch Photoshop rip through the process, then go check your Proof Catcher folder.
Is it there? Does it look right? Good!
Protip: Maximize Photoshop when you run these actions. I've had Photoshop misplace the watermark when I run the actions in anything but full screen. I mostly run into this problem when I'm batch processing images, which may be because I multitask while I'm waiting. I've even had to re-record the action after really messing things up.
BATCH PROCESSING
Now the sweetness of this process comes when you want to watermark a hundred or so proofs for the web - all at once.
Here's how:
Step 1: Open Bridge and go to the folder of full-size images you want to turn into proofs.
Step 2: Check the lower-left corner of your Bridge window. Look for a tab called Filter - Orientation. Options here are Landscape and Portrait - here's where we'll select one set of images or the other and run the appropriate horizontal or vertical action on them. For now, click on Landscape to show only your landscape-oriented photos.
Step 3: Select All, then go to your Tools menu at the top, then Photoshop - Batch. In this dialog, you'll select your Watermark Horizontal action in the drop down. Ensure your other settings are as follows: Source = Bridge; uncheck Override Action "Open" Commands and Include All Subfolders; do check Suppress File Open Options Dialogs and Suppress Color Profile Warnings. Destination should be set to None. Click OK.
Photoshop will then rip through all the files you selected and run your action on each one. For your vertical images, just repeat the process, but in Bridge uncheck Landscape and check Portrait under orientation. When you come to your Batch dialog, select your Watermark Vertical action.
Go check your Proof Catcher folder and admire how many proofs you were able to create in a matter of minutes! Create a Web Proofs folder alongside your original images and move all your proof files there for safekeeping.
Some caveats:
- The full-size files you apply these actions to must always have the same ratio - such as mine are all 2:3 since that's how my camera shoots and how I crop. If you crop each image differently, the above action won't work for you - the watermark will either show up too high or too low.
- If you adjust your images in Camera Raw like I do, make sure you create a set of JPEGs with adjustments applied before running these actions. I've found Camera Raw adjustments won't come through when the proof is made. When I'm done post processing a set of files, I use Tools - Photoshop - Image Processor in Bridge to create a new folder of JPEGs at 10 quality with Resize unchecked. I then run my actions on these files.
- Your mileage may vary. This system works great for me in Photoshop CS4, but may not translate well to other versions. If things go awry, try repeating the steps, paying attention to what options your software offers along the way. If all else fails, hit up the support forum for your preferred software and point them to this tutorial for ideas on how to make it work in your program.
- I apologize that this tutorial comes in a step-by-step form instead of how it should, as a streaming video. I'm testing out screencasting software with little success, and I'm too stubborn to just buy the wonderful Camtasia suite...yet.
If all goes as planned, you will be able to make sets of web-sized proofs in the absolute minimum of time. As a part time photographer, your hourly rate of pay is directly tied to the amount of time you invest into each step of your workflow. Where you save time, you save money.
NEXT STEPS
- If you haven't already, go through the above tutorial step by step and set up your own speedy watermark system. Don't obsess too much with watermarking - just come up with something fast that gets your name out there if folks borrow your files for their social media profiles or to send to friends and family.
- If you're deeply concerned that putting your images online for the whole world to steal will kill your sales, you can read my thoughts on safeguards and online proofing here on PartTimePhoto.com.
- Brainstorm session: How can you encourage your clients to post your proofs to their Facebook profile? Perhaps an incentive or contest? File this in your Brainstorms folder.
- My writing at PartTimePhoto.com exists to serve your needs as an amateur photographer making the transition to paid professional. I appreciate and welcome your readership, and invite you to click the free “Subscribe” link at the top of any page of this site.
- What Photoshop tricks have helped you cut down on your time spent in post processing? Leave a comment below, e-mail me, or call or text me at 830-688-1564.


